
Ever tried switching your AirPods between two Apple IDs and felt like pulling your hair out? It’s like your AirPods have a mind of their own, right?
I get it, and it can be super frustrating.
Here’s the thing. Your AirPods like to stick to one Apple ID at a time. It’s like they have a favorite. Sometimes, it’s not just a simple pick-up-and-switch situation.
You might run into trouble because of software glitches or annoying iCloud limitations. Yup, there are a few hidden gremlins in the system.
But don’t worry! This might sound like some tech puzzle, but I’ve got your back. We’re gonna make this switch super simple.
By the end, you’ll have answers. Your AirPods will glide between IDs like a breeze. Sounds good? Let’s dive in!
Why your AirPods are not switching between Apple IDs
Alright, before we jump into fixing it, let’s quickly talk about why this is happening. Understanding the problem makes it a lot easier to solve it.
1. AirPods Stick to One Apple ID
Your AirPods are pretty loyal. Once they pair with an Apple ID, they get attached. It’s like they form a bond.
Breaking that bond isn’t automatic—you have to step in and help them move on. So, if you’re trying to switch to a different Apple ID, you’ll need to manually reset or unpair them first.
2. Software Glitches Can Be Pesky
Sometimes, it’s not even about loyalty. It’s just a small glitch messing with your AirPods. If your iPhone or iPad isn’t updated, or if there’s a random bug, your AirPods might refuse to switch. Keeping your devices up-to-date helps avoid these annoying hiccups.
3. iCloud Has Its Limits
iCloud is smart, but it’s not perfect. Your AirPods remember the Apple ID they’re linked to through iCloud.
If you’re trying to switch, iCloud might block the move unless you make some changes. Checking and adjusting your iCloud settings can really help.
Now that you know why it’s happening, let’s move on to fixing it. Ready? Let’s get those AirPods switching smoothly!
Can’t Switch AirPods Between Two Apple IDs – What to Do
Okay, now we know the “why.” Let’s fix the “how.” I’ll walk you through the best solutions, step-by-step. Stick with me, and we’ll make your AirPods behave.
#1: Unpair and Reconnect AirPods
First things first, let’s try unpairing and reconnecting. It’s simple but powerful.
Sometimes your AirPods just need a clean break from the old Apple ID. Here’s how you can do it:
- Open your iPhone and go to Settings.
- Tap on Bluetooth.

- Find your AirPods name in the list and tap the little “i” next to it.
- Tap Forget This Device and confirm.

Now, open the AirPods case next to the device with your new Apple ID. Wait for the prompt to pop up and follow the instructions. Easy, right?
#2: Update Your Devices
If unpairing didn’t do the trick, don’t worry. Let’s make sure your devices are updated.
Updates fix bugs and improve connections. Sometimes, that’s all your AirPods need.
Here’s how to update:
- Go to Settings on your iPhone.
- Tap General.

- Tap Software Update.
- If an update is available, tap Update Now.

After updating, try reconnecting your AirPods again. Fresh software often makes everything smoother.
#3: Reset Your AirPods
Still stuck? No problem. Let’s reset your AirPods completely.
Resetting wipes the memory clean, so they forget the old Apple ID. Here’s what to do:
- Put your AirPods in their case and keep the lid open.
- Press and hold the button on the back of the case.
- Keep holding until the LED light flashes amber and then white.
Done! Now your AirPods are like new. You can pair them easily with your new Apple ID.
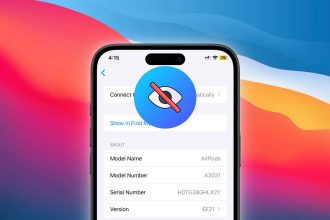
#4: Check iCloud Settings
Sometimes, iCloud settings can be the sneaky culprit.
Let’s double-check everything:
- Open Settings on your iPhone.
- Tap your name at the top to open Apple ID settings.
- Tap Find My.

- Make sure your AirPods aren’t locked to the old Apple ID.
If they are, you might need to remove them from your iCloud account first. It’s all about clearing the path for a smooth switch.
By now, you should feel a lot more confident about switching your AirPods. If it’s still a little tricky, don’t stress. Sometimes it takes a couple of tries. You’ve got this!
Tips to make your AirPods switch super smooth
Let’s add a few more tricks to your toolkit. These are small things, but they can make a big difference!
1. Regularly Clean Your AirPods Case
Dust, dirt, and pocket lint can mess with the connections. It’s a good idea to wipe down your AirPods case every now and then. Keeping it clean helps with syncing and pairing.
2. Keep Your Devices Nearby
Distance matters! Always keep your iPhone, iPad, or Mac close when switching. Your AirPods need a strong Bluetooth connection to make the switch smoothly.
3. Monitor Battery Levels
Low battery can make your AirPods act weird. Try to keep them charged. A healthy battery means a healthy connection.
4. Use Automatic Switching Wisely
Automatic switching is cool—when it works. If it’s causing trouble, you can turn it off in Bluetooth settings. Sometimes manual connection is just easier.
5. Restart Devices Occasionally
When in doubt, restart. Restarting your iPhone or iPad can clear hidden bugs. It’s like giving your devices a fresh start too!
These little habits can save you a lot of frustration later on. Trust me, they’re worth it!
The takeaway
Switching AirPods between two Apple IDs might seem frustrating at first, but it’s totally fixable.
Remember to unpair and reconnect if they’re stuck. Always keep your devices updated to avoid random glitches. And don’t assume iCloud will magically handle everything—it often needs a little nudge.
With a bit of patience and these easy fixes, you’ll have your AirPods switching between accounts like a pro.
Got any questions or more tips that worked for you? Share them in the comments**! I’d love to hear how it went for you.


